skip to main |
skip to sidebar
Arriving in Euston rather early for a meeting near London Bridge on Friday 21st August 2015, I decided on a quick 'whizz' looking at former Southern Railway stations. I descended into Euston Underground station and took the London Underground Northern Line (Charing Cross Branch) to Charing Cross.
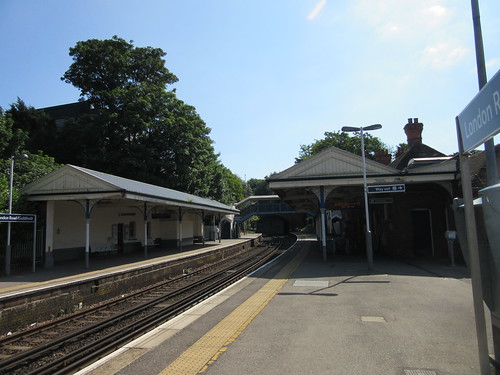
At Charing Cross Station the impressive building facing the road provided by the South Eastern & Chatham Railway (SE&CR) has been retained and still has its hotel (now called the AMBA HOTEL CHARING CROSS). The original, fairly modest, concourse enjoying good natural lighting also remains but redevelopment has made the platforms themselves subterranean in appearance, illuminated by elaborate but rather dated looking lighting.
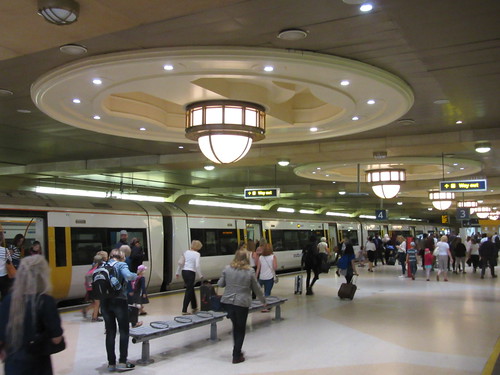 Platforms 3 and 4 at Charing Cross.
I realised that Southeastern trains do not currently stop at London Bridge, which is currently the focus of major works under the title Thameslink Programme, so I boarded the first departure and travelled just one stop to Waterloo East to see what's there now.
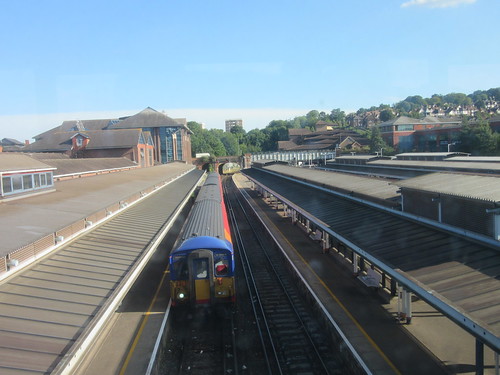
Immediately before arriving at Waterloo East, there's a good view of Waterloo terminal station next door. The elegant facade of the station contrasts oddly with the extended graffiti on the viaduct carrying the Charing Cross route.
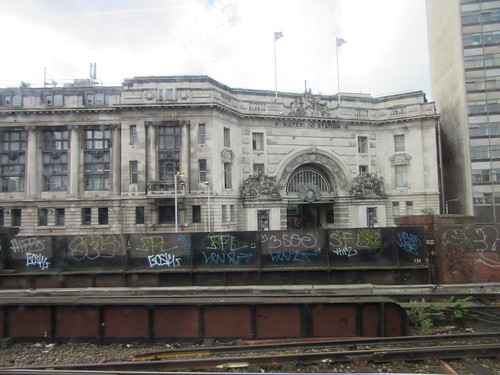 Waterloo station: The elegant facade of the station contrasts oddly with the extended graffiti on the viaduct carrying the Charing Cross route.
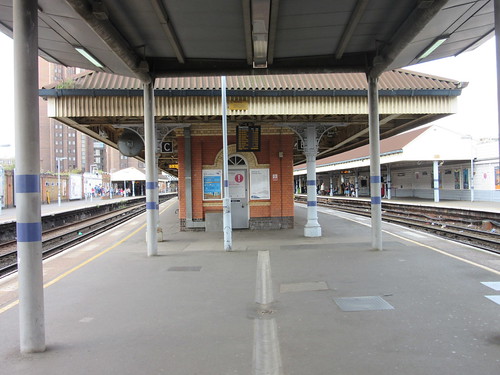
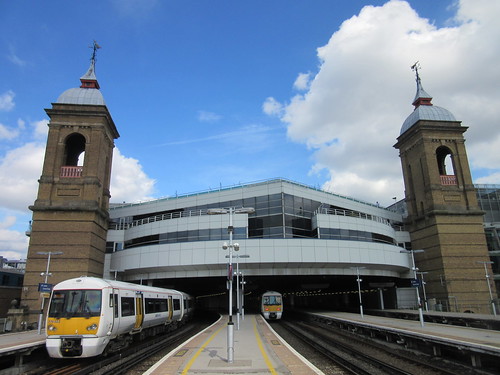
Waterloo East is a quite attractive station on the quadruple track route (paired by use) from Charing Cross to London Bridge. There is one island platform and two flanking platforms, all identified alphabetically as A - D, presumably to avoid confusion with its rather larger sister, Waterloo, to which it is connected by a footbridge at the Charing Cross end of the platforms. The early platform awnings and buildings survive, in a good state of restoration. I found the multi-coloured brickwork, simple detailing and cast iron, decorated columns quite pleasing.
Of course, many of the modern features jar. At some stage, the footbridge has been enclosed with the top pierced by a series of rather mean-sized windows. To accommodate all the electrical, signalling and communication requirements of today's railway, the buildings have been adorned with surface-mounted cable trunking. At the London Bridge end of the station, a subway interconnects the platforms and gives access to Southwark Underground station on the Jubilee Line. Needless to say, the interconnection to the Jubilee Line is in 'modernist' style, indifferent to the earlier station features with which it is juxtaposed. Modern platform awnings have been provided to cover what was formerly the exposed ends of the platforms - a useful feature but materials, treatment and even the roof height differ from the original.
 Waterloo East station: looking towards Charing Cross.
I took the footbridge to Waterloo main station where the pedestrian route emerges at the Waterloo Balcony Level. Escalators connect the Balcony with the concourse level and the platforms. I've written a little about the terminus at Waterloo in the post Waterloo Station, London. I took the opportunity to take a picture of the famous 4-sided clock.
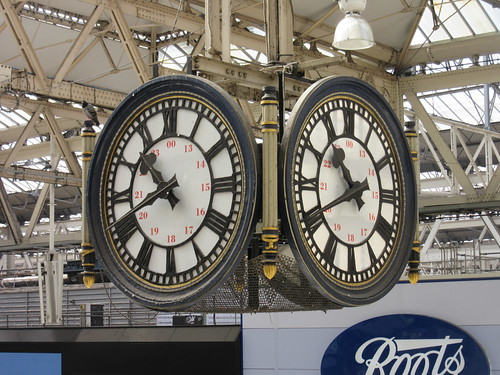 Waterloo station: Detail of the famous clock suspended above the concourse.
The short-lived and expensive platforms of Waterloo International (which were used by 'Eurostar' trains before HS1 and St. Pancras International were opened) have been brought into use again for domestic services, but I hadn't time to check out this area, instead descending the escalator to Waterloo underground station and catching a Jubilee Line service to London Bridge.
I walked to my meeting at a building near the moored H.M.S. Belfast, which I visited in 2012 as described here. With business concluded, I returned to London Bridge station. In order to have a closer look at the rebuilding in progress, I decided to catch a train from London Bridge to Cannon Street.
Until the Thameslink Programme started, London Bridge had six through platforms serving the SE&CR lines from the termini at Charing Cross and Cannon Street. The remainder of the platforms used by the Lodon Brighton & South Coast Railway (LB&SCR) were terminal, covered by an airy, glazed all-over roof comprising a central arched roof flanked by a series of glazed bays on either side.
 London Bridge in 2010 showing the terminal platforms with their all-over roof. The egregious 'Shard' starts its inexorable rise in the background.
All this has changed. On my visit, there were three through platforms serving the Cannon Street lines. The other through platforms have gone, replaced by two temporary through lines allowing Charing Cross services to run through without stopping. Six terminal platforms remain in use, connected to a large, new concourse area abutting the base of the Shard (the European Union's tallest building according to the Wikipedia article here. Later, at the beginning of 2017, I made a visit to 'The View from the Shard', described here, which gives excellent views of the railways around London Bridge).
It was only after my visit that I found the Network Rail description of the London Bridge project here and a Station Guide showing what's currently in use here.
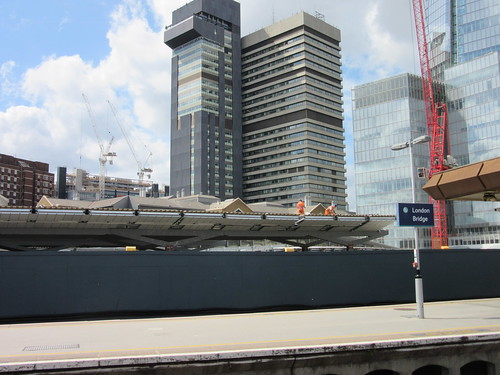 London Bridge in August 2015. View from platform 2 showing the grey hoarding dividing off the worksite, where two men can be seen working on new platform roofing. Red construction crane on the right and the base of the Shard.
I boarded a Cannon Street service but we'd only moved a short distance before suffering a signal check. Then, we slowly crossed the River Thames and arrived at Cannon Street station. The station retains its elegant twin towers but they are made to look faintly ridiculous by the appearance of the commercial development which has replaced the all-over roof, condemning yet another set of station platforms to a twilight existence.
 London Cannon Street Station.
I descended to the Underground at Cannon Street - this time to the District and Circle Line forming part of the 'Sub-Surface Line' network built using cut-and-cover techniques. The westbound train I caught was one of the fairly new 'S stock' sets built by Bombardier. They have similarities with the Bombardier sets for the London Overground featuring wide, walk-through access from coach to coach. I think they appear in seven- and eight-coach variants, with different seating plans. The set I travelled in had seating set against the sides allowing more space for standing passengers.
 District & Circle Line: Bombardier 'S' stock.
I changed trains at Embankment, catching a Northern Line train back to Euston where I boarded a Virgin service to Birmingham. Another train and a bus concluded my travelling for the day.
My pictures
London Charing Cross Station.
London: Waterloo Station.
London Bridge Station.
London Cannon Street Station.
[Link to post about visiting the Shard added 10-Apr-2017]
 Click here for larger view.
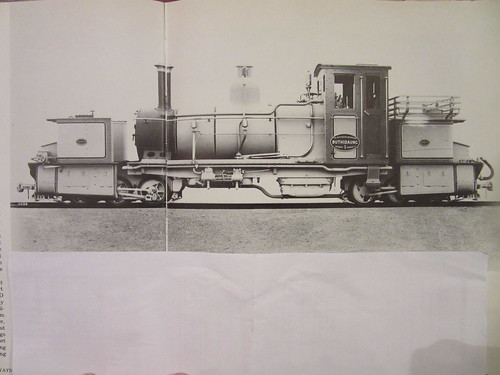
0-6-0+0-6-0 Garratt locomotive 'Buthidaung' No. 1 of the Buthidaw-Maungdaw Tramway Company Ltd. built Beyer Peacock, maker's number 5702 of 1913 (Photo: Beyer Peacock).
In Part 3 of Hugh Hughes invaluable guide to railway locomotives in India (introduced here), there is a brief description of the long-gone Arakan Light Railway in Burma (Myanmar), from which this account is derived.
The Arakan Flotilla Company founded the Buthidaung - Maungdaw Tramway Company in March 1913, to construct a 2ft 6in (762 mm) narrow gauge railway between these towns to improve communications in the remote area near Burma's border with what is now Bangladesh.
The consultant was Everard Richard Calthrop (1857-1927) who had worked for Robert Stephenson, the L&NWR, the GWR and the Great India Peninsula Railway before ill health forced his return to England in 1892 where he established a consulting practice.
In 1895 he was Consulting Engineer to the Barsi Light Railway in India (see the Wikipedia article here) where he was able to implement his ideas for effective narrow gauge railways - a combination of 2ft 6in gauge laid with 30 pounds per yard rail and an axleload of 5 Imperial tons on all axles. This proved very successful and his formula was adopted widely, including on the Arakan Light Railway and on the Leek and Manifold Light Railway in the U.K.
There's more information about the man in Grace's Guide here and Wikipedia here.

According to an illustrated booklet published in 1914:-
"The chief object of the tramway is to cater for the enormous inflow of coolies who yearly emigrate from Chittagong into Arakan for the rice harvest and work in connection with the rice mills, and also for the ploughing of the fields and the sowing an transporting of the crop. Many of these coolies travel on foot by overland tracks which converge near Maungdaw and diverge again at Buthidaung, and the Arakan Flotilla's launches bring a large number from Ucha Ghat at the head of the Naaf river down to Maungdaw. When the tramway is built, through tickets will be available right down to Akyab, by tramway and launch. As soon as the present line is in working order, further extensions towards the crowded districts of Chittagong and the roadless tracks of Arakan will be undertaken."
This enthusiasm was not shared by the public and in October 1916 Martin & Company of Calcutta registered the Arakan Light Railway Company in order to purchase and complete the line, with support from the Governments of India and Burma and the Arakan Flotilla Company. To cross the Mayu Range, two tunnels and gradients as severe as 1 in 33 were required. The line was just over 18 miles long.
The railway opened on 15th February 1919 but receipts were disappointing and covered only half the expenses, resulting in liquidation and sale to the Indian Government for dismantling.
The line had three locomotives whose fate is not known:-
0-6-0 saddle tank with 21.5 in. dia. coupled wheels and cylinders 7 in. x 12 in. built by W. G. Bagnall, maker's number 1900 of 1912 'Muriel' (no running number).
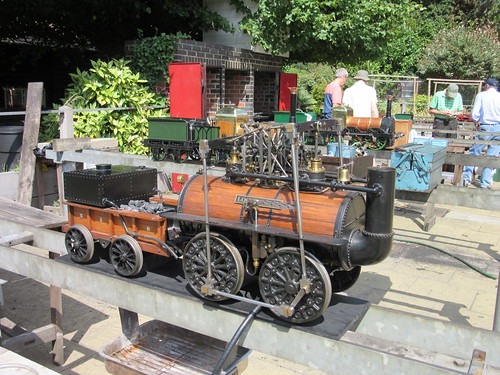
0-6-0+0-6-0 Garratt with 24 in. dia. coupled wheels and cylinders (4) 8.5 in. x 12 in. built by Beyer Peacock, maker's number 5702 of 1913 'Buthidaung' (running number 1).
0-6-0+0-6-0 Garratt with 24 in. dia. coupled wheels and cylinders (4) 8.5 in. x 12 in. built by Beyer Peacock, maker's number 5703 of 1913 'Maungdaw' (running number 2).
To meet the requirements of a tramway, the four sets of motion were enclosed - possibly the only Garratts so enclosed. They were arranged for left-hand drive and were provided with a vacuum ejector for train braking.There were three water tanks:-
280 gallons (smokebox end)
110 gallons (firebox end)
160 gallons (under boiler).
These two Garratts were the smallest ever built by Beyer Peacock.
Every year, the Old Locomotive Committee (OLCO) organises a get-together, called 'Lionsmeet' for modellers of the 'Lion' locomotive (and similar models of designs from the early days of railways). On Saturday 8th August 2015, 'Lionsmeet' returned to the home of Guildford Model Engineering Society (GMES) at Stoke Park, Guildford.
Getting there
I travelled by train to Guildford and there's a brief write-up at By Rail to Guildford.
The Event
My train took me to 'London Road (Guildford)' station, from where I walked along London Road to Stoke Park and signed in as a visitor at the GMES entrance. For more details of GMES, go to their website here.
The Steaming Bays are always the centre of activities and I found a number of our members there, together with John Brandrick (Chairman), Jon Swindlehurst (Treasurer & Membership Secretary), John Hawley (Magazine Editor) and Andrew Neish (Lionsmeet Organiser).
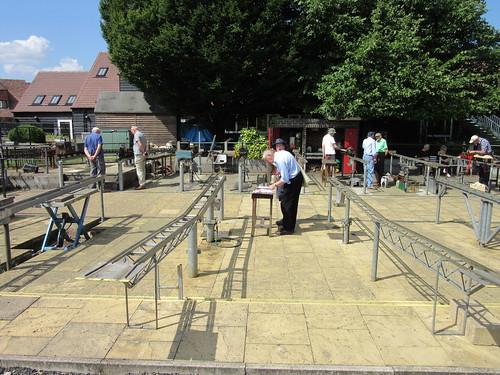 The Steaming Bays at Guildford M.E.S., with John Brandrick and Andrew Neish talking at the table in the centre of the picture. The lifting trusses in the foreground allow models to be conveniently transferred directly to and from parked vehicles.
Guildford is the 'home club' for both Andrew and his father David and together they were steaming David's reliable 'Lion' model. Jon Swindlehurst steamed his very successful 'Lion' and other 'Lion' models were also being prepared for service.
John Hawley kindly took me to the Clubhouse for a welcome cup of tea. The Clubhouse detained me for a while, because an interesting display of models had been arranged. My eye was taken by a handsome 0-4-0 tank locomotive named 'Cynthia'. Published as a 5 inch gauge design, "Gemma" was serialised in "Engineering in Miniature" magazine as a model of the Great Eastern Railway 0-4-0 built by Neilson & Company in 1874 (incidentally, there's a little about Neilson's in my post North British Locomotive Company Limited).
 The label on this striking model read: "Gemma built as the drawings came out in Engineering in Miniature c1983. She has had a hard life and can pull 3 adults with the blower full on. Living in the Gunnislake area in Cornwall at the time she is in the East Cornwall Minerals Railway livery. Our garden railway reflecting the full size a mile away. David and Lily Scott Reading."
There was a live-steam model of 'Invicta' from the Canterbury and Whitstable Railway. Mention of the Canterbury and Whitstable always reminds me of my favourite dialogue from the film 'The Titfield Thunderbolt' which I quote in my eponymous post here.
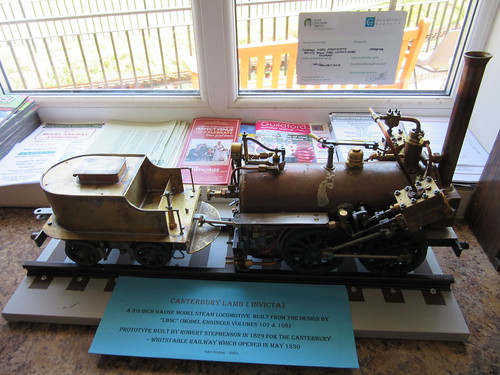 "Canterbury Lamb (Invicta) a 3.5 inch steam locomotive built from the design by 'LBSC' (Model Engineer Volumes 107 & 108). Prototype built by Robert Stephenson in 1829 for the Canterbury-Whitstable Railway which opened in May 1830. Peter Christmas - GMES."
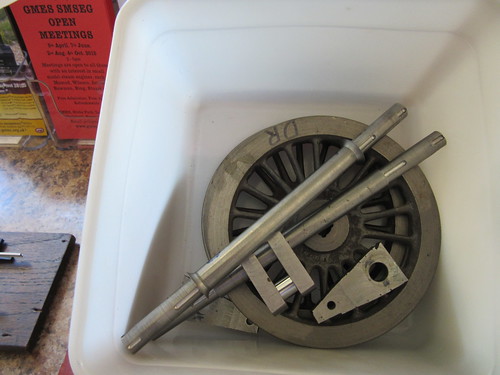
 Work in progress: Wheels and (far left) chassis: "Will be 'Royal George' by Timothy Hackworth 1827. No 'real' plans survive - so half the battle is to produce the 'engineering drawings'".
 Work in progress: Foreground: "5 in Gauge Lion under construction. Owner - John Hawley. Built to this stage by Michael Lee, loco and tender chassis completed. Running gear started. Boiler by Blackgates. All to LBSC design." Background: "Boiler for 7.25 in gauge Lion. Designed: John Hawley (OLCO). Built: Peter Carr (Kingswood Boilers)."
It was good to see that John Hawley is producing what he calls "Lionswarf" and is modelling, as well as editing.
 "A few of the components required to construct the leading and crank axle/wheel assemblies. I'm experimenting with round keys and semi circular keyways." - John Hawley.
In addition, one end of the Clubhouse housed a large well-detailed 4mm scale layout based on the long-gone G.W.R. terminus 'Cheltenham Spa St. James'.
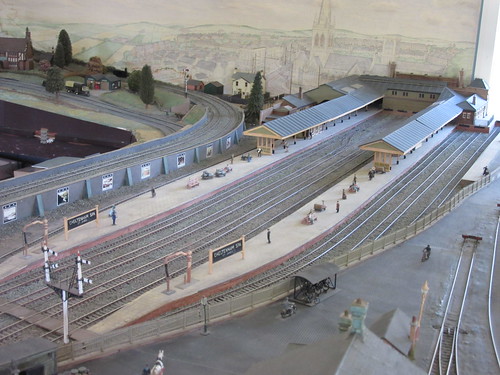 A view of part of the 4mm scale layout.
Fortified by a cup of tea, I found the Safety Officer, was kitted out with a High-Visibility jacket and then allowed to survey the running lines on foot. There are two 'deformed oval' running lines.
The inner circuit is an elevated dual-gauge track which features clockwise running. Colour light signals are provided. These operate automatically from short track-circuited sections in appropriate positions. The outer circuit is ground level 7.25" gauge with anti-clockwise running. This circuit also has signalling but the signal heads (which are removed after a running day for security) were not needed for 'Lionsmeet'. Part of this circuit is dual-gauge 5"/7.25", giving rise to some impressive dual-gauge pointwork. The ground level track has an attractive brick-built carriage and locomotive shed. A spur, complete with a number of semaphore ground disc signals built in 'Southern Railway' style leads to a turntable. This is a mature site and the extensive steaming bays with the large traverser are substantial and well-engineered.
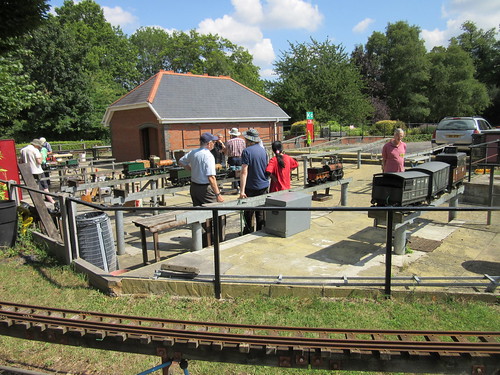 Lionsmeet 2015: Looking across the steaming bays towards the Carriage Shed.
 Andrew Neish moving the impressive Traverser in the Steaming Bays.
The steaming bays featured a 'Locomotion' model, lifted clear of the rails, operating on compressed air. A fascinating sight! There's a video clip on YouTube here. When you've watched the video, use the 'Back Button' to return to this post.
 'Locomotion', lifted off the rails, was running on compressed air.
There are two other layouts offering live-steam running. The first is a well-established 32mm gauge fully landscaped layout intended for narrow gauge models.
 The 32mm gauge landscaped 'narrow gauge' circuit.
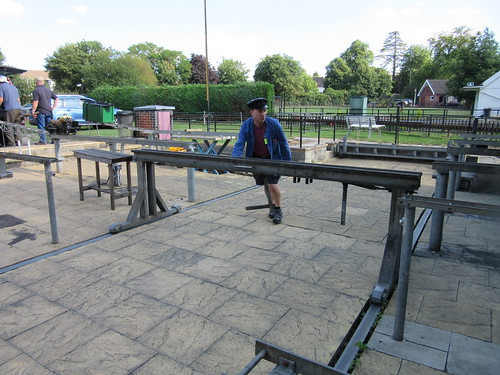
The second is a more-recent Gauge 1 layout featuring a double-track oval with sidings. This is built on a raised baseboard.
 Gauge 1 elevated layout under construction.
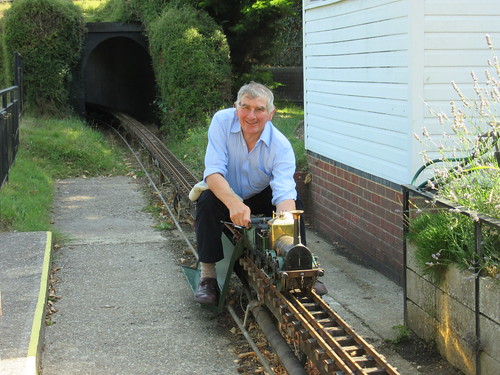
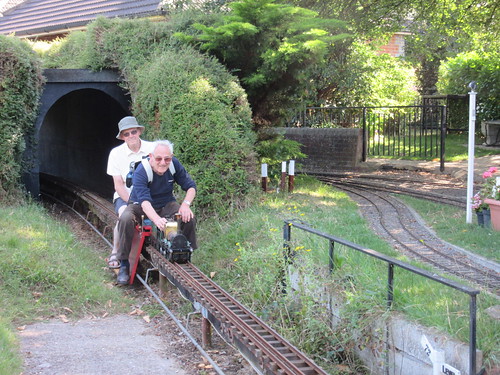
Various models of 'Lion' were steamed during the day. Sometimes the driver would be alone, sometimes one or more passengers would be taken - informality is the style of 'Lionsmeet'. Occasionally, OLCO members without a 'Lion' model would be given the opportunity to drive. David Neish kindly allowed me to take a turn on his 'Lion'.
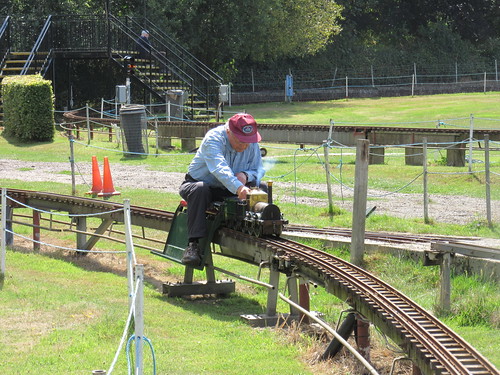 David Neish passing over the Sector Table which gives access to and from the Steaming Bays.
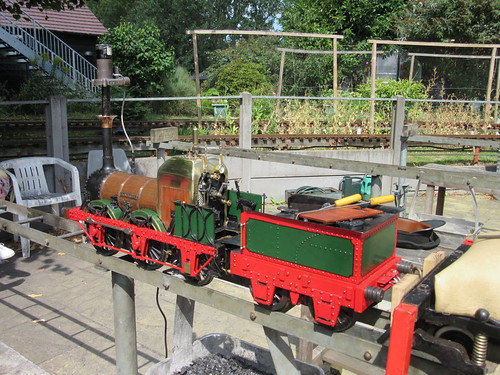
 'Lion' with a rather smart driving trailer passing over the Two-leaf Swing Bridge.
One performer was in the striking red and green livery from the film and carried 'Thunderbolt' nameplates.
 'Thunderbolt', in the striking livery from the film.
The host society had provided a splendid buffet lunch in the Clubhouse, so most railway activities ceased for a while, before resuming with added gusto. Later in the day, both John Brandrick and John Hawley had a drive.
 John Brandrick driving David Neish's 'Lion'.
 John Hawley at speed with Jon Swindlehurst's 'Lion'.
John Dalton from Chelmsford M.E.S. had brought his 7.25in gauge 'Lion'. I'd first seen this model at Kinver during 'Lionsmeet 2010 (there's a brief description here) but at Guildford, I managed to get a ride behind this engine.

John Dalton's 7.25in 'Lion' performed on the ground level circuit.
David Neish was determined to steam his Gauge 1 Aster 'Lion'. It was set up on the Gauge 1 layout and, with assistance from Roger Hayward, was successfully steamed. I found the management of these Methylated Spirits powered models most strange - no water gauge, no pressure gauge (but there is a safety valve). Although water can be added, this is done from a dispensing bottle against boiler pressure. Apparently, when it runs out of water, the absence of steam to the blower means that the boiler remains safe! After a bit of experimenting, 'Lion' successfully completed a lap and honour was satisfied. An OLCO member had brought his own Aster 'Lion' which he had never steamed and, with suitable ministrations from Roger Hayward, this, too, operated to the owner's delight.
 Two Gauge 1 Aster 'Lion' models.
At 'Lionsmeet' 2014, a new member surprised us by displaying an early 'Lion' model he'd acquired. Well, no, he didn't bring his locomotive and run it at Guildford. Instead, he surprised us by arriving in his veteran 'Alvis'.
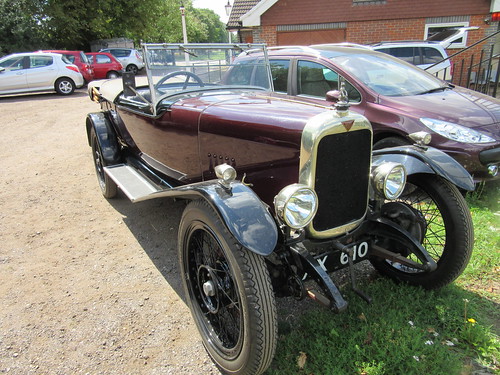 One OLCO member arrived in this veteran 'Alvis'.
We enjoyed wonderful weather and the Guildford Club had made us most welcome, so it was another successful 'Lionsmeet' and thanks are due to all concerned. As a tailpiece, I couldn't resist this picture of Roger Hayward's unusual live steam narrow gauge locomotive 'Nanny Bubbles' which he ran on the 32mm gauge track.
 Lionsmeet 2015: Roger Hayward's narrow gauge 0-4-4T 'single-ended Fairlie' 'Nanny Bubbles' on the 32mm gauge layout.
Lionsmeet pictures
Lionsmeet 2015.
[Video clip of 'Locomotion' model added 22-Aug-2015]
On Saturday 8th August 2015, I travelled to Guildford to attend the 2015 'Lionsmeet' at the Guildford Model Engineering Society.
I took the first bus from Brewood to Wolverhampton at 06:43, walked to the railway station and managed to catch the 07:25 'Virgin' service to London Euston. The seat reservation system was not working so I suffered the inconvenience of being asked to move by a party who apparently had reservations for a group of seats including the one I'd taken. This would be less annoying if it were not a fairly common experience. In general, Train Managers seem to believe a simple statement that the system is not working is sufficient. There's no evidence that staff and management feel that 'customers' (as they insist on calling passengers) have been let down. However, we made it to London on time at 09:15.
The usual irritation of negotiating Euston's concourse to reach the Underground entrance followed. The area was packed with people and their luggage standing and studying the departure display, making it difficult to find a way through, particularly since other people were also attempting to criss-cross the concourse in different directions, often oblivious of the effect of their own wheeled luggage in the confined area. I caught a Northern Line train to Waterloo - crowded but tolerable.
The concourse at Waterloo was thronged but not as packed as Euston. Waterloo was the London terminus of the London and South Western Railway (L&SWR) and there's a little about this famous station here. South West Trains provide fast, frequent third-rail electric trains which stop at Guildford but I chose instead a South West Trains stopping train from Platform 1. South West Trains are part of the 'Stagecoach' group which operates a number of rail franchises ("let's have rail competition, but not too much").
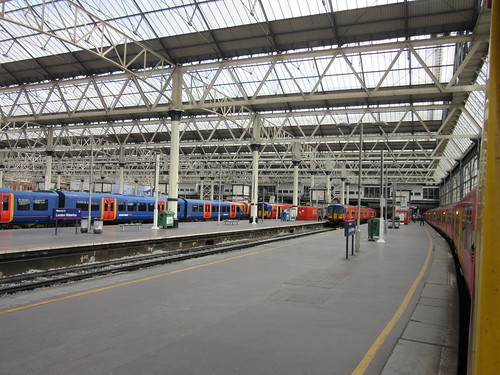 View across Waterloo station from platform 1.
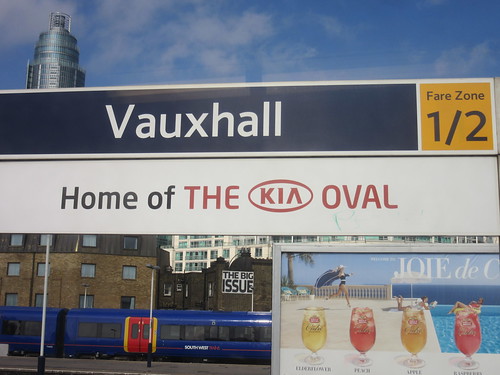
We left on time, and soon made a brief stop at Vauxhall, the nearest station to the Oval. In 2013, I rather grumpily wrote "The Oval (which we are now supposed to call 'The Brit Insurance Oval')". No longer - new nameboards at the station proclaim that Vauxhall is now "The home of the KIA Oval". At least, I think that's what is says. With the modern obsession with 'branding' the car company's logo replaces the letter 'A' with an inverted 'V'. I weep for the English language.
We ran fast through Queenstown Road and paused at Clapham Junction. There's a post about Clapham Junction (also touching on Vauxhall and Queenstown Road) here.
We continued to Raynes Park where we diverged from the main line to Woking and continued (stopping at all stations) to Epsom. Here, a branch trailed in on our left, originally built by the London, Brighton & South Coast Railway bringing trains from Mitcham and West Croydon directions. Epsom still has two island platforms providing four platform faces.
We continued through Ashtead to Leatherhead. After Leatherhead there's a junction where the straight-on route leads to Dorking and Horsham. This line was also built by the London, Brighton & South Coast Railway and the the 'Pre-Grouping Railway Junction Diagrams 1914' (see Maps below) show the line from Epsom to Leatherhead as 'L&SWR/LB&SCR Joint. Even today, it's a separate Train Operating Company which works the route through Epsom to Horsham - Southern.
At the junction, my train took the sharply-curved right-hand route leading to Effingham Junction where the L&SWR branch from Surbiton trailed in from the right (having passed through the rather exotically-named station of Cobham and Stoke D'Abernon). At Effingham Junction, there's a storage and maintenance depot for Multi Purpose Vehicles. Railway Multi Purpose Vehicles are used variously for rail head treatment, weed spraying and conductor rail de-icing but no 'hardware' was on show.
 Effingham Junction, showing the MPV Maintenance Depot.
We soon reached the penultimate stop for the service at 'London Road (Guildford)', where I alighted. This is a very rural station in contrast with the final stop for my train at Guildford itself. The London Road station which I was brought up with was located in Manchester, now renamed 'Piccadilly' but I discovered that there are two 'London Road' stations south of London - one at Guildford and one at Brighton.
 London Road (Guildford).
A brisk walk along London Road led me to 'Lionsmeet' and, after an enjoyable day at Guildford Model Engineering Society (described here), I retraced my steps to 'London Road (Guildford)' station. For variety, I decided to travel to Guildford Station and return towards London on a fast service.
 View of Guildford Station from the covered footbridge, looking towards London. The train I'd arrived on is on the right in Platform 1, the 'Cobham Bay'.
 View of Guildford Station from the covered footbridge, looking away from London.
Within a few minutes, I was on an 'Up' train which stopped at Worplesdon, Woking (where we joined the line from Basingstoke and the West) and then was 'Fast' to Clapham Junction. I left the service here and crossed to the former LB&SCR platforms to catch a 'Down' train to East Croydon, since I wanted to visit my friend Rita.
Maps
[1] 'Pre-Grouping Railway Junction Diagrams 1914', published by Ian Allen (ISBN 0 7110 1256 3).
[2] Details of the modern railways south of London are shown in one of the 'Quail Track Diagrams' books:-
'Railway Track Diagrams Book 5: Southern and TfL' Third Edition, published by TRACKmaps (ISBN 978-0-9549866-4-3).
Related information on other websites
Historic:
London and South Western Railway (Wikipedia).
London, Brighton and South Coast Railway (Wikipedia).
Modern:
South West Trains.
South West Trains Network Map.
Southern.
Southern Network Map.
Related posts on this website
Waterloo Station, London.
Clapham Junction Station, London
My pictures
London: former 'Southern' lines.
In 2015, the Peak Rail 1940s Weekend took place at the beginning of August. I was rostered as steam driver with Dave P. as fireman on Sunday, 2nd August - the second day of the event. As I arrived at Rowsley, the various tented camps for military re-enactors were stirring.
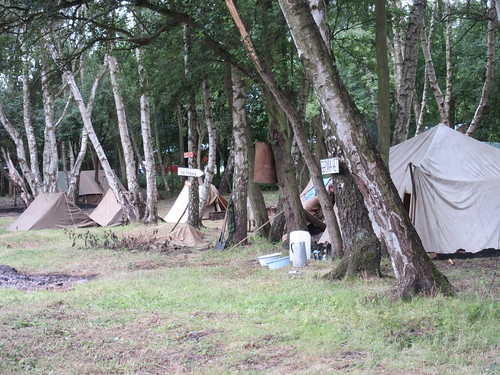 Tents in the wooden area, with the Russian 2nd Guards Rifle Division in the foreground.
With my interest in Burma, I was pleased to see a small group representing the W.A.S.(B) - the Women's Auxiliary Service (Burma) which operated from 1942 to 1946. There's a brief article about the wartime work of W.A.S.(B) on Wikipedia here.

A wartime picture of a W.A.S.(B) Canteen (Photo: Wikipedia via Creative Commons).
Whilst preparing our locomotive we were visited by an American lady War Correspondent re-enactor who had based her character on a real wartime journalist who worked for a Chicago newspaper.
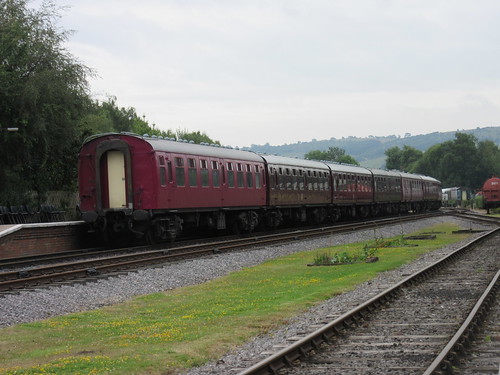 The 7-coach train stabled in the platform at Rowsley. The 'Class 31' is out of sight at the far end of the stock.
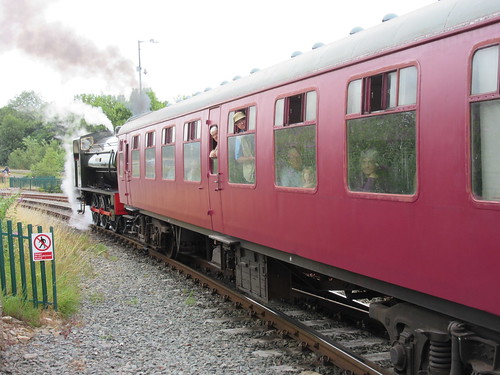
We were 'booked' to marshal 'Lord Phil' on the north end of the 7-coach train, with the 'Class 31' on the south end. I'd expected to find our locomotive turned so that we worked 'chimney leading' coming back from Matlock, as we had done for the 1940s Weekend in 2014 and 2013, but 'Lord Phil' had not been turned (drawing critical comments from a couple of enthusiasts who thought working bunker first was 'inelegant' (their description was rather more 'earthy'). We were hooked onto the train in good time and the 'Class 31' had been left coupled to the stock overnight. There were lots of people arriving, many of them in civilian or military dress for the period. The first train at 11:15 was pretty crowded.

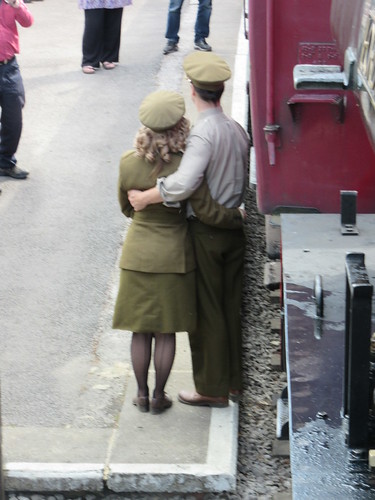
Civilian and military dress for the period on display.
During the day, we completed the five round trips to Matlock Town station without much difficulty. Some variety was introduced since we were working bunker-first at the north end (although we'd worked like this earlier in the year when the water tank at the south end of Rowsley station was found to be empty, as described here). We also had the relative luxury of more conventional watering facilities at the north end of Rowsley (avoiding the need to drag fire hoses around, as is the case currently at the south end).
 'Lord Phil' at Matlock Town, ready to return to Rowsley.
Wartime entertainment was provided throughout the day in a large, aluminium-framed marquee adjacent to the station at Rowsley.
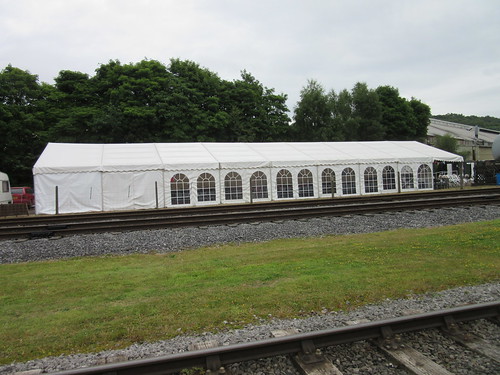 The marquee at Rowsley.
During the day I managed a brief visit to the marquee, in time to see Paul Harper introduce Sue and Steve Mace's exuberant dancing to the music of the Ashby Little Big Band. With the band's line-up of saxophones, they certainly captured the Glenn Miller swing style always associated with the second World War.
 Sue and Steve Mace dance to the music of the Ashby Little Big Band.
The marquee was always busy with people enjoying the entertainment and making full use of the bar, which was being looked after by Richard. In addition, the LMSCA were operating a refreshment stall.
 The LMSCA refreshment stall in the marquee.
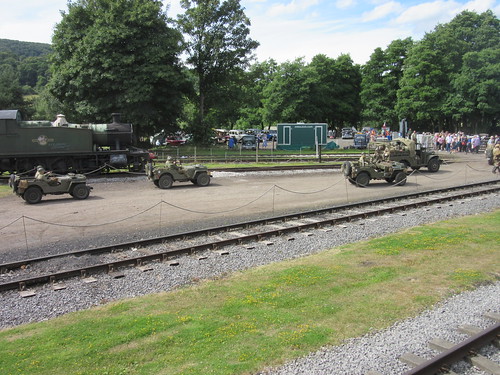
The Picnic Area featured displays of civilian and military vehicles of the period, together with a number of trade stands.
 Part of the display of civilian vehicles.
The afternoon features a battle re-enactment. Working on the train, you don't get to see the action because the train is sent to Matlock before it starts and isn't allowed to return until the re-enactment has finished. All the public are moved from the Picnic Area to the east side of the railway and, whilst the train is absent, the platform forms a viewing area for the public.
 Prior to the battle re-enactment, the Americans take up their initial positions whilst the public are moved from the Picnic Area to the east side of the railway.
I understand the dramatisation featured German troops overwhelming the Russian camp and subsequently surrendering to a counter-attack by Americans and Russians with superior firepower. The re-enactment represented the final period of WWII and concluded with an announcement that the German forces had capitulated so that the war in Europe was over.
"Happy Days are here again!"
Related posts/pictures
I've participated in the 1940s Weekend at Peak Rail a number of times.
2014 event (pictures only).
2013 event (article with link to pictures).
2012 event (article with link to pictures).
2009 event (article with link to pictures).
2008 event (article with link to pictures).
2007 event (pictures only).
2006 event (pictures only).
My pictures of the 2015 event
Peak Rail 1940s Weekend, 2015


